Difference between revisions of "Transcode"
RogerDPack (talk | contribs) |
m (→Completely non-interactive transcoding: Correct syntax error) |
||
| (32 intermediate revisions by 7 users not shown) | |||
| Line 1: | Line 1: | ||
| − | Transcoding is the process of taking a video file and changing it to a different format or bitrate. | + | {{See also|Documentation:Modules/transcode}} |
| + | {{Outdated}} | ||
| + | Transcoding is the process of taking a video file and changing it to a different format or [[bitrate]]. | ||
| − | Transcoding in VLC copies the movie to a new file in a different format, so you end up with both the original and new files. This means you need to have enough space on your hard drive to store this extra file. You should also have a reasonably fast computer, as transcoding can be very slow. | + | Transcoding in {{VLC}} copies the movie to a new file in a different format, so you end up with both the original and new files. This means you need to have enough space on your hard drive to store this extra file. You should also have a reasonably fast computer, as transcoding can be very slow. |
| − | In VLC, transcoding is exactly the same as [[streaming]] | + | In VLC, transcoding is exactly the same as [[streaming]] across a network, except that the output is sent to a file instead of a network. |
== Compatibility issues == | == Compatibility issues == | ||
| − | If your input streams already matches the encoding that you desire for your output stream, then you don't have to transcode at all (just leave out the transcode settings on the command line, and it will thence not transcode). In the GUI this is called "keep the original track" (I think). | + | If your input streams already matches the encoding that you desire for your output stream, then you don't have to transcode at all (just leave out the transcode settings on the command line, and it will thence not transcode). In the {{GUI}} this is called "keep the original track" (I think). |
| − | Note that when you decide your transcoding settings, only some container formats (muxers) can support some codecs | + | Note that when you decide your transcoding settings, only some container formats (muxers) can support some codecs—look at [https://www.videolan.org/streaming/features.html streaming features] compatibility matrix to see which supports what. If your current format is incompatible with the muxer you desire, then you must transcode it to something compatible, or choose a different muxer. If you choose an incompatible stream for a given muxer, it may silently fail. You can look for error messages in the messages window to help you debug the failures. |
== Transcoding with the Wizard == | == Transcoding with the Wizard == | ||
| − | VLC includes a transcoding and streaming wizard. To transcode a file, just select the transcode option. You will then be asked what format to convert to: you can give a | + | VLC includes a transcoding and streaming wizard. To transcode a file, just select the transcode option. You will then be asked what format to convert to: you can give a [[video codec]], an [[audio codec]] and a [[container]] format. |
| + | <gallery> | ||
| + | File:VLC - media menu.png|alt=|Open the Media menu and select Convert/Save | ||
| + | File:Basic interface convert.png|alt=|The wizard | ||
| + | File:Convert.png|alt=|The wizard on a different system | ||
| + | File:Qt4 Streaming Transcoding.png|alt=|Choosing the codecs | ||
| + | </gallery> | ||
| − | + | == Command-line == | |
| − | + | The most flexible way to transcode with VLC is through a [[command-line interface]]. Transcoding works the same as [[streaming]]. For example, the following command changes an [[asf]] file to an [[MPEG-2]] file: | |
| − | + | {{Prompt|cmd}} {{Path to VLC|windows}} "C:\Movies\Your File.asf" --sout='#transcode{vcodec=mp2v,vb=4096,acodec=mp2a,ab=192,scale=1,channels=2,deinterlace}:std{access=file,mux=ps,dst="C:\Movies\Your File Output.ps.mpg"}' | |
| − | |||
| − | |||
| − | + | The <code>access=file</code> instructs vlc to store the output in a file (and not stream it), and the <code>dst</code> is the '''d'''e'''st'''ination of the new (output) file. | |
| − | |||
| − | + | * Note 1: If you are running VLC on [[macOS]], you should change <code>vlc</code> to <code>vlc -I dummy</code> to avoid possible <samp>Bus error</samp> problems. | |
| + | * Note 2: old VLC releases, maybe up to 0.8.6* included, use <code>url</code> instead of <code>dst</code>. | ||
| + | Transcoding takes quite a while, so it's advisable to use an option like <code>--stop-time=30</code> to only encode the first 30 seconds—this means you can check the file has transcoded correctly, and that the output is of a suitable quality. (Note: On macOS this trick doesn't seem to work. Just press <kbd>Ctrl-C</kbd> after a while, VLC will properly write out the already transcoded segment). | ||
| − | The transcode statement can contain | + | The transcode statement can contain <code>vcodec</code> and <code>vb</code> to change the [[video codec]] and <code>acodec</code> and <code>ab</code> to change the [[audio codec]]. If <code>vcodec</code> is missing, the video codec will stay the same (same for <code>acodec</code>). |
| + | A common additional option to use is <code>[[deinterlace]]</code> (to increase quality slightly on interlaced video). | ||
| + | |||
| + | === Windows === | ||
| − | |||
| − | |||
the syntax on windows is slightly different: | the syntax on windows is slightly different: | ||
| − | + | {{Prompt|cmd}} {{Path to VLC|windows}} --no-repeat --no-loop -vv "D:\688497.flv" --sout='#transcode{vcodec=mp4v,acodec=mpga,vb=800,ab=128,deinterlace}:standard{access=file,mux=ts,dst="D:\asd.mpg"}' | |
| − | (Note: old VLC releases, maybe up to 0.8.6* included, use | + | |
| + | (Note: old VLC releases, maybe up to 0.8.6* included, use <code>url</code> instead of <code>dst</code>) | ||
| + | |||
| + | (Note: due to command line parsing, at times, especially within single and double quote blocks, a backslash may have to be escaped by using a double backslash so that a filename would be <code>D:\\path\\to\\file.mpg</code>) | ||
| + | |||
| + | (Note: without the options <code>--no-repeat</code> <code>--no-loop</code>, you may find that loop options selected in the {{GUI}} cause transcodes to fail.) | ||
| + | |||
| + | === Completely non-interactive transcoding === | ||
| + | |||
| + | For completely non-interactive transcoding (such as the case necessary when running under [[macOS]]), the above example could be rewritten as: | ||
| − | + | {{$}} {{Path to VLC|mac}} --no-repeat --no-loop -I dummy /Users/<username>/Documents/Your File.asf --sout='#transcode{vcodec=mp2v,vb=4096,acodec=mp2a,ab=192,scale=1,channels=2,deinterlace}:std{access=file, mux=ps,dst="/Users/<username>/Documents/Your File Output.ps.mpg"}' vlc://quit | |
| − | |||
| − | |||
| − | |||
The two extra options are | The two extra options are | ||
| − | + | * -I dummy: Disables the graphical interface | |
| − | + | * <nowiki>vlc://quit</nowiki>: Quit VLC after transcoding | |
| − | If transcoding from a DVD, it is also necessary to use the dvdsimple:// notation instead of the dvd:// notation, in order to avoid interacting with the DVD menu system. You can use this in the GUI by choosing 'no DVD menus' option when opening the disc. | + | If transcoding from a DVD, it is also necessary to use the <code>dvdsimple://</code> notation instead of the <code>dvd://</code> notation, in order to avoid interacting with the DVD menu system. You can use this in the {{GUI}} by choosing ''no DVD menus'' option when opening the disc. See [[Rip DVD]]. |
| + | |||
| + | If the <code>-I dummy</code> option spawns an extra command prompt with error-message <samp>vbv buffer overflow</samp> you may try <code>-I rc</code> instead, which would ordinarily open a text interface but – under Windows – behaves exactly like the <code>dummy</code> interface. | ||
| − | + | == Video Filters == | |
| + | === Canvas and Padding === | ||
| − | |||
'''The canvas and padding options changed since Version 0.9. Most examples in the wiki are broken.''' | '''The canvas and padding options changed since Version 0.9. Most examples in the wiki are broken.''' | ||
| Line 62: | Line 78: | ||
** false: crop video | ** false: crop video | ||
| + | <pre>transcode{vcodec=mp2v,vfilter=croppadd{croptop=20,cropbottom=30,paddleft=100}}</pre> | ||
| + | |||
| + | crop or pad top, left, right or bottom in pixels. | ||
| + | |||
| + | === Rotation example === | ||
| + | |||
| + | <pre>vlc --no-repeat --no-loop -I dummy -vv InputFile.mov --sout-avcodec-strict=-2 --transform-type=180 --sout=#transcode{vcodec="h264",vb="1500",acodec="mp4a",ab="96","channels=2",samplerate="44100",vfilter="transform"}:standard{access="file",mux="mp4",dst="OutputFile.mp4"} vlc://quit</pre> | ||
| − | + | Options for transform-type: 90,180,270,hflip,vflip,transpose,antitranspose | |
| − | + | Avoid using <code>width</code> and <code>height</code> parameters, also <code>maxwidth</code> and <code>maxheight</code>! These are applied before the <code>vfilter</code> and might result in unwanted results. | |
| − | + | == Non-Interactive Batch Transcoding (Windows) == | |
| + | === Batch File === | ||
| − | |||
To transcode several files without user interaction create a batch file in the folder where the files are contained and this line to the batch file: | To transcode several files without user interaction create a batch file in the folder where the files are contained and this line to the batch file: | ||
| + | <syntaxhighlight lang="dos">for %%a in (*.FILE_EXT) do cmd /c "PATH_TO_VLC" --no-repeat --no-loop -I dummy -vv %%a --sout=#transcode{vcodec=VIDEO_CODEC,vb=VIDEO_BITRATE,scale=1,acodec=AUDIO_CODEC,ab=AUDIO_BITRATE,channels=6}:standard{access=file,mux=MUXER,dst=%%a.OUTPUT_EXT} vlc://quit</syntaxhighlight> | ||
| + | |||
| + | * note: if the line above creates "double file name extensions" like <samp>*.FILE_EXT.OUTPUT_EXT</samp> (e.g. <samp>*.mp3.wav</samp> when converting mp3 to wav), try: | ||
| + | :<syntaxhighlight lang="dos">... dst=OUTPUT_PATH\%%~na.OUTPUT_EXT ...</syntaxhighlight> | ||
| − | < | + | <div class="plainlist"> |
| − | + | * <code>%%~na</code> is the file name of <code>%%a</code> only without extension. | |
| − | </ | + | * <code>Cmd /c</code> makes the script wait to finish transcoding before starting the next transcode. |
| + | </div> | ||
| − | + | * Example: to convert all mp3-files in the current directory to standard uncompressed wav-files ([[PCM]]; may be suitable if you want to burn audio-cds and your player is unable to play *.mp3-files), type: | |
| + | :<syntaxhighlight lang="dos">for %%a in (*.mp3) do cmd /c "C:\Programme\VideoLAN\VLC\vlc.exe" -I dummy -vv %%a --sout #transcode{acodec=s16l,channels=2,samplerate=44100}:standard{access=file,mux=wav,dst=g:\_audio_conv\%%a.wav} vlc://quit</syntaxhighlight> | ||
| − | + | === VB Script === | |
| − | This example | + | An alternative method is to use VB Script. This example will transcode all files from one folder to another. It will also wait for each file to finish transcoding before starting the next. Create the script <code>transcode.vbs</code>, in the VLC installation folder, default <code>{{Path to VLC|windows|dir=y}}</code>. Change the <code>strSource</code> and <code>strTarget</code> in the example to match your requirements. Start a "[[Command prompt|DOS Box]]", Start → Run → cmd then change to the VLC folder and run the script <code>"cscript transcode.vbs"</code>. |
| − | < | + | This example was tested on Microsoft Windows Script host 5.6 running on XP Pro SP2: |
| + | <syntaxhighlight lang="vb"> | ||
' | ' | ||
' based on code from:http://episteme.arstechnica.com/eve/forums/a/tpc/f/12009443/m/516001349831 | ' based on code from:http://episteme.arstechnica.com/eve/forums/a/tpc/f/12009443/m/516001349831 | ||
| Line 146: | Line 176: | ||
Next | Next | ||
End Sub | End Sub | ||
| − | </ | + | </syntaxhighlight> |
| + | |||
| + | == Non-Interactive Batch Transcoding (Linux) == | ||
| − | |||
To transcode several files without user interaction create a bash script in the folder where the files are contained and add these lines to the bash script: | To transcode several files without user interaction create a bash script in the folder where the files are contained and add these lines to the bash script: | ||
| − | + | <syntaxhighlight lang="bash"> | |
| − | < | ||
#!/bin/bash | #!/bin/bash | ||
vcodec="VIDEO_CODEC" | vcodec="VIDEO_CODEC" | ||
| Line 163: | Line 193: | ||
for a in *$fmt; do | for a in *$fmt; do | ||
| − | $vlc -I dummy - | + | $vlc -I dummy -vv "$a" --sout "#transcode{vcodec=$vcodec,vb=$bitrate,acodec=$acodec,ab=$arate,channels=6}:standard{mux=$mux,dst=\"$a.$ext\",access=file}" vlc://quit |
done | done | ||
| − | </ | + | </syntaxhighlight> |
| + | |||
| + | === Non-Interactive Merge/Transcode (Windows) === | ||
| − | + | If you have more than one source files that need to be merged and transcoded resulting in a single output file, see [[How to Merge and Transcode Multiple Videos]]. | |
| − | + | === Example script === | |
| − | |||
'''The canvas and cropping must be adjusted for VLC versions newer then 0.9.''' | '''The canvas and cropping must be adjusted for VLC versions newer then 0.9.''' | ||
| − | As an example, here is a bash script that will take a < | + | As an example, here is a bash script that will take a <code>.mpg</code> file as generated by an [[DVB]] capture device and transcode it into an [[MPEG4]] file using the [[h.264]] codec. Copy it to a file, for example <code>dvb2mp4</code>, and make it executable. It should work on any operating system that has bash, including windows if [https://www.cygwin.com Cygwin] is installed. It uses the cropping parameters proposed at [[Wikipedia:Overscan amounts|overscan amounts]] adapted so that the dimensions are divisible by 16 for better encoding. |
| − | < | + | <syntaxhighlight lang="bash"> |
#!/bin/bash | #!/bin/bash | ||
# | # | ||
| Line 283: | Line 314: | ||
echo "Encoding at $bitrate+$arate kb/s, input $src, $aspect, cropping $crop, de-interlace $deint" | echo "Encoding at $bitrate+$arate kb/s, input $src, $aspect, cropping $crop, de-interlace $deint" | ||
echo | echo | ||
| − | echo '>>>' $VLC -I dummy "$infile" --sout "#transcode{$sizestr$deintstr,vcodec=h264,vb=$bitrate,acodec= | + | echo '>>>' $VLC -I dummy "$infile" --sout "#transcode{$sizestr$deintstr,vcodec=h264,vb=$bitrate, acodec=mpga,ab=$arate,channels=2,samplerate=44100}:standard{mux=mp4,dst=\"$outfile\",access=file}" vlc://quit |
echo | echo | ||
| − | $VLC -I dummy "$infile" --sout "#transcode{$sizestr$deintstr,vcodec=h264,vb=$bitrate,acodec= | + | $VLC -I dummy "$infile" --sout "#transcode{$sizestr$deintstr,vcodec=h264,vb=$bitrate, acodec=mpga,ab=$arate,channels=2,samplerate=44100}:standard{mux=mp4,dst=\"$outfile\",access=file}" vlc://quit |
| − | </ | + | </syntaxhighlight> |
[[Category:Glossary]] | [[Category:Glossary]] | ||
| + | [[Category:Transcoding]] | ||
Latest revision as of 10:03, 8 April 2019
| This page is outdated and information might be incorrect. Create an account to start editing, and then click here to update this article. |
Transcoding is the process of taking a video file and changing it to a different format or bitrate.
Transcoding in VLC media player copies the movie to a new file in a different format, so you end up with both the original and new files. This means you need to have enough space on your hard drive to store this extra file. You should also have a reasonably fast computer, as transcoding can be very slow.
In VLC, transcoding is exactly the same as streaming across a network, except that the output is sent to a file instead of a network.
Contents
Compatibility issues
If your input streams already matches the encoding that you desire for your output stream, then you don't have to transcode at all (just leave out the transcode settings on the command line, and it will thence not transcode). In the GUI this is called "keep the original track" (I think).
Note that when you decide your transcoding settings, only some container formats (muxers) can support some codecs—look at streaming features compatibility matrix to see which supports what. If your current format is incompatible with the muxer you desire, then you must transcode it to something compatible, or choose a different muxer. If you choose an incompatible stream for a given muxer, it may silently fail. You can look for error messages in the messages window to help you debug the failures.
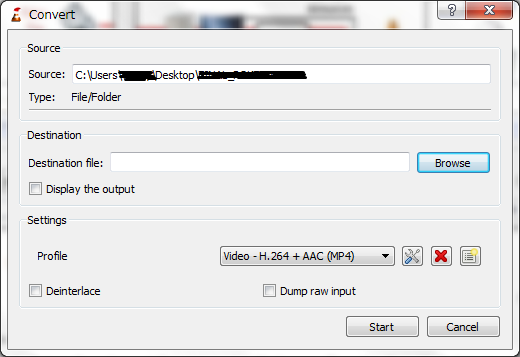
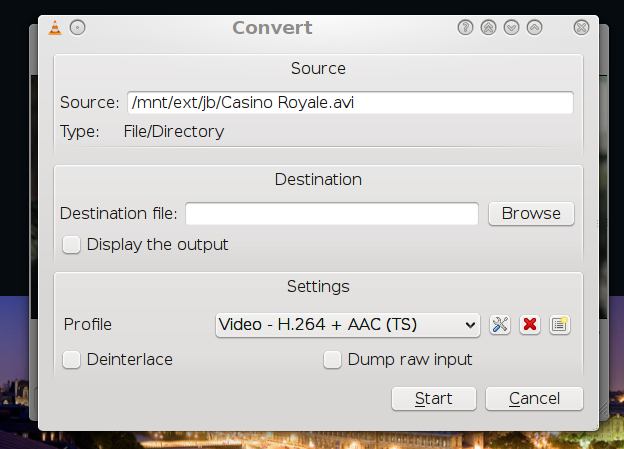
Transcoding with the Wizard
VLC includes a transcoding and streaming wizard. To transcode a file, just select the transcode option. You will then be asked what format to convert to: you can give a video codec, an audio codec and a container format.

Open the Media menu and select Convert/Save
The wizard
The wizard on a different system
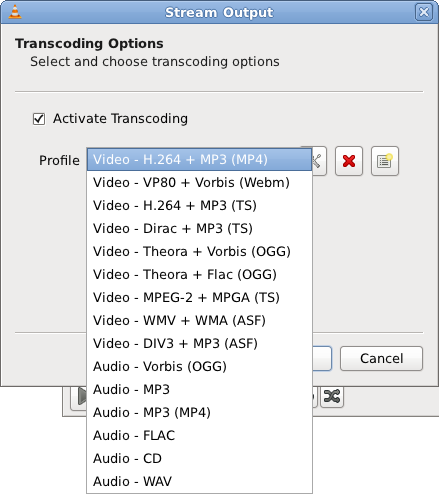
Choosing the codecs


Command-line
The most flexible way to transcode with VLC is through a command-line interface. Transcoding works the same as streaming. For example, the following command changes an asf file to an MPEG-2 file:
> "%PROGRAMFILES%\VideoLAN\VLC\vlc.exe" "C:\Movies\Your File.asf" --sout='#transcode{vcodec=mp2v,vb=4096,acodec=mp2a,ab=192,scale=1,channels=2,deinterlace}:std{access=file,mux=ps,dst="C:\Movies\Your File Output.ps.mpg"}'
The access=file instructs vlc to store the output in a file (and not stream it), and the dst is the destination of the new (output) file.
- Note 1: If you are running VLC on macOS, you should change
vlctovlc -I dummyto avoid possible Bus error problems. - Note 2: old VLC releases, maybe up to 0.8.6* included, use
urlinstead ofdst.
Transcoding takes quite a while, so it's advisable to use an option like --stop-time=30 to only encode the first 30 seconds—this means you can check the file has transcoded correctly, and that the output is of a suitable quality. (Note: On macOS this trick doesn't seem to work. Just press Ctrl-C after a while, VLC will properly write out the already transcoded segment).
The transcode statement can contain vcodec and vb to change the video codec and acodec and ab to change the audio codec. If vcodec is missing, the video codec will stay the same (same for acodec).
A common additional option to use is deinterlace (to increase quality slightly on interlaced video).
Windows
the syntax on windows is slightly different:
> "%PROGRAMFILES%\VideoLAN\VLC\vlc.exe" --no-repeat --no-loop -vv "D:\688497.flv" --sout='#transcode{vcodec=mp4v,acodec=mpga,vb=800,ab=128,deinterlace}:standard{access=file,mux=ts,dst="D:\asd.mpg"}'
(Note: old VLC releases, maybe up to 0.8.6* included, use url instead of dst)
(Note: due to command line parsing, at times, especially within single and double quote blocks, a backslash may have to be escaped by using a double backslash so that a filename would be D:\\path\\to\\file.mpg)
(Note: without the options --no-repeat --no-loop, you may find that loop options selected in the GUI cause transcodes to fail.)
Completely non-interactive transcoding
For completely non-interactive transcoding (such as the case necessary when running under macOS), the above example could be rewritten as:
$ /Applications/VLC.app/Contents/MacOS/VLC --no-repeat --no-loop -I dummy /Users/<username>/Documents/Your File.asf --sout='#transcode{vcodec=mp2v,vb=4096,acodec=mp2a,ab=192,scale=1,channels=2,deinterlace}:std{access=file, mux=ps,dst="/Users/<username>/Documents/Your File Output.ps.mpg"}' vlc://quit
The two extra options are
- -I dummy: Disables the graphical interface
- vlc://quit: Quit VLC after transcoding
If transcoding from a DVD, it is also necessary to use the dvdsimple:// notation instead of the dvd:// notation, in order to avoid interacting with the DVD menu system. You can use this in the GUI by choosing no DVD menus option when opening the disc. See Rip DVD.
If the -I dummy option spawns an extra command prompt with error-message vbv buffer overflow you may try -I rc instead, which would ordinarily open a text interface but – under Windows – behaves exactly like the dummy interface.
Video Filters
Canvas and Padding
The canvas and padding options changed since Version 0.9. Most examples in the wiki are broken.
transcode{vcodec=mp2v,vfilter=canvas{width=640,height=480}}
Other options:
- aspect=4:3 : Aspect ratio
- padd:
- true: Pad with black bars
- false: crop video
transcode{vcodec=mp2v,vfilter=croppadd{croptop=20,cropbottom=30,paddleft=100}}
crop or pad top, left, right or bottom in pixels.
Rotation example
vlc --no-repeat --no-loop -I dummy -vv InputFile.mov --sout-avcodec-strict=-2 --transform-type=180 --sout=#transcode{vcodec="h264",vb="1500",acodec="mp4a",ab="96","channels=2",samplerate="44100",vfilter="transform"}:standard{access="file",mux="mp4",dst="OutputFile.mp4"} vlc://quit
Options for transform-type: 90,180,270,hflip,vflip,transpose,antitranspose
Avoid using width and height parameters, also maxwidth and maxheight! These are applied before the vfilter and might result in unwanted results.
Non-Interactive Batch Transcoding (Windows)
Batch File
To transcode several files without user interaction create a batch file in the folder where the files are contained and this line to the batch file:
for %%a in (*.FILE_EXT) do cmd /c "PATH_TO_VLC" --no-repeat --no-loop -I dummy -vv %%a --sout=#transcode{vcodec=VIDEO_CODEC,vb=VIDEO_BITRATE,scale=1,acodec=AUDIO_CODEC,ab=AUDIO_BITRATE,channels=6}:standard{access=file,mux=MUXER,dst=%%a.OUTPUT_EXT} vlc://quit- note: if the line above creates "double file name extensions" like *.FILE_EXT.OUTPUT_EXT (e.g. *.mp3.wav when converting mp3 to wav), try:
... dst=OUTPUT_PATH\%%~na.OUTPUT_EXT ...
%%~nais the file name of%%aonly without extension.Cmd /cmakes the script wait to finish transcoding before starting the next transcode.
- Example: to convert all mp3-files in the current directory to standard uncompressed wav-files (PCM; may be suitable if you want to burn audio-cds and your player is unable to play *.mp3-files), type:
for %%a in (*.mp3) do cmd /c "C:\Programme\VideoLAN\VLC\vlc.exe" -I dummy -vv %%a --sout #transcode{acodec=s16l,channels=2,samplerate=44100}:standard{access=file,mux=wav,dst=g:\_audio_conv\%%a.wav} vlc://quit
VB Script
An alternative method is to use VB Script. This example will transcode all files from one folder to another. It will also wait for each file to finish transcoding before starting the next. Create the script transcode.vbs, in the VLC installation folder, default "%PROGRAMFILES%\VideoLAN\VLC". Change the strSource and strTarget in the example to match your requirements. Start a "DOS Box", Start → Run → cmd then change to the VLC folder and run the script "cscript transcode.vbs".
This example was tested on Microsoft Windows Script host 5.6 running on XP Pro SP2:
'
' based on code from:http://episteme.arstechnica.com/eve/forums/a/tpc/f/12009443/m/516001349831
'
'
'
Dim objFSO, objShell, strSource, strTarget, strOldName, strNewName
'
set objFSO = CreateObject("Scripting.FileSystemObject")
'
' Set up starting folders
'
strSource = "O:\"
strTarget = "N:\"
'
call RecurseDir(strSource, strTarget)
'
' // Recursively copy all files and folders
'
Sub RecurseDir(strSource, strTarget)
	wscript.echo "source: " & strSource & " target: "& strTarget
'
	Dim strTempSource, strTempTarget
'
	Set strTempSource = objFSO.GetFolder(strSource)
'
	Wscript.Echo "Begin Value: " & strTarget
'
	If Not objFSO.FolderExists(strTarget) Then
'        Wscript.Echo "No Folder! Creating folder [" & strTarget & "]"
		objFSO.CreateFolder(strTarget)
	Else
		Wscript.Echo "Folder exists! " & strTempTarget
	End If
'
	Set strTempTarget = objFSO.GetFolder(strTarget)
' ** Copy files from current directory to target
	For each file in strTempSource.files
		strOldName = strSource & "\" & file.name
		strNewName = strTempTarget & "\" & Mid(file.name, 1, InstrRev(file.name, ".")) & "ts"
'
		If Not objFSO.FileExists(strNewName) Then
			Set objShell = CreateObject("WScript.Shell")
'
			Wscript.Echo "Transcoding file: " & strOldName & " to " & strNewName
'
			Select Case Right(strOldName, 3)
				Case "avi"
					wscript.echo "vlc file://""" & strOldName & """ :sout=#duplicate{dst=std{access=file,mux=ts,dst=""" & strNewName & """}} vlc://quit"
					objShell.Run "vlc file://""" & strOldName & """ :sout=#duplicate{dst=std{access=file,mux=ts,dst=""" & strNewName & """}} vlc://quit", 1, True
				Case "mp4"
					wscript.echo "vlc file://""" & strOldName & """ :sout=#transcode{vcodec=mp2v,vb=1024,scale=1,acodec=mp2a,ab=192,channels=2}:duplicate{dst=std{access=file,mux=ts,dst=""" & strNewName & """}} vlc://quit"
					objShell.Run "vlc file://""" & strOldName & """ :sout=#transcode{vcodec=mp2v,vb=1024,scale=1,acodec=mp2a,ab=192,channels=2}:duplicate{dst=std{access=file,mux=ts,dst=""" & strNewName & """}} vlc://quit", 1, True
			End Select
'
			Set objShell = Nothing
		End If
	Next
' ** For each subfolder of current dir, copy files to target and recurse its subdirs
	For each subdir in strTempSource.subfolders
	  Wscript.Echo subdir.path
  	call RecurseDir(subdir.path, strTempTarget & "\" & subdir.name)
	Next
End Sub
Non-Interactive Batch Transcoding (Linux)
To transcode several files without user interaction create a bash script in the folder where the files are contained and add these lines to the bash script:
#!/bin/bash
vcodec="VIDEO_CODEC"
acodec="AUDIO_CODEC"
bitrate="VIDEO_BITRATE"
arate="AUDIO_BITRATE"
ext="OUTPUT_EXT"
mux="MUXER"
vlc="PATH_TO_VLC"
fmt="INPUT_EXT"

for a in *$fmt; do
$vlc -I dummy -vv "$a" --sout "#transcode{vcodec=$vcodec,vb=$bitrate,acodec=$acodec,ab=$arate,channels=6}:standard{mux=$mux,dst=\"$a.$ext\",access=file}" vlc://quit
done
Non-Interactive Merge/Transcode (Windows)
If you have more than one source files that need to be merged and transcoded resulting in a single output file, see How to Merge and Transcode Multiple Videos.
Example script
The canvas and cropping must be adjusted for VLC versions newer then 0.9.
As an example, here is a bash script that will take a .mpg file as generated by an DVB capture device and transcode it into an MPEG4 file using the h.264 codec. Copy it to a file, for example dvb2mp4, and make it executable. It should work on any operating system that has bash, including windows if Cygwin is installed. It uses the cropping parameters proposed at overscan amounts adapted so that the dimensions are divisible by 16 for better encoding.
#!/bin/bash
#
# Transcode DVB TV signals to h.264-encoded MP4 files using VLC
# Wout.Mertens@gmail.com

#### Defaults, please edit for your settings ####

# VLC location, here is the Mac OS X example
VLC=/Applications/VLC.app/Contents/MacOS/clivlc
# Other possibilities: (Remove the # to activate)
#VLC=/usr/bin/vlc
#VLC=/usr/local/bin/vlc

# 16:9 or 4:3
aspect=16:9

# PAL (Europe) or NTSC (US)
src=PAL

# video bitrate
bitrate=1024

# audio bitrate
arate=128

# cropping?
crop=yes

# Deinterlace?
deint=yes

#### Program, do not change below this line ####
usage() {
	cat 1>&2 <<EOF
Usage: $0 [-swpncC] [-b <rate>] [-a <rate>] <DVB source .mpg> <MP4 output file>
	-s	4:3 aspect ratio (default=$aspect)
	-w	16:9 aspect ratio
	-p	PAL (720x576) input (default=$src)
	-n	NTSC (720x480) input
	-c	Crop borders (default=$crop)
	-C	Do not crop borders
	-d	Perform de-interlacing (default=$deint)
	-D	Do not perform de-interlacing
	-b	video bitrate kb/s (default=$bitrate)
	-a	audio bitrate kb/s (default=$arate)
EOF
	exit 1
}

error() {
	echo "ERROR: $*" 1>&2
	exit 2
}

while getopts 'swpncCb:a:h' opt; do
	case $opt in
		s) aspect=4:3 ;;
		w) aspect=16:9 ;;
		p) src=PAL ;;
		n) src=NTSC ;;
		c) crop=yes ;;
		C) crop=no ;;
		d) deint=yes ;;
		D) deint=no ;;
		b) bitrate=$OPTARG ;;
		a) arate=$OPTARG ;;
		h) usage ;;
		*) echo "Unknown option $opt" 1>&2; usage ;;
	esac
done
shift $(( $OPTIND - 1 ))

[ $# -ne 2 ] && usage

infile="$1"
outfile="$2"
case $outfile in
	*.mp4|*.MP4) : ;;
	*) outfile="$outfile.mp4" ;;
esac

[ -r "$infile" ] || error "Can't read from $infile"

case "$src,$aspect,$crop" in
	PAL,16:9,yes) sizestr="cropleft=31,cropright=31,croptop=16,cropbottom=16,width=960,height=544" ;;
	PAL,4:3,yes)  sizestr="cropleft=31,cropright=31,croptop=16,cropbottom=16,width=720,height=544" ;;
	NTSC,16:9,yes) sizestr="cropleft=30,cropright=30,croptop=17,cropbottom=17,width=800,height=448" ;;
	NTSC,4:3,yes) sizestr="cropleft=26,cropright=26,croptop=17,cropbottom=17,width=608,height=448" ;;
	PAL,16:9,no) sizestr="width=1024,height=576" ;;
	PAL,4:3,no) sizestr="width=768,height=576" ;;
	NTSC,16:9,no) sizestr="width=800,height=448" ;;
	NTSC,4:3,no) sizestr="width=608,height=448" ;;
	*) error "Could not handle $src,$aspect,$crop. This shouldn't happen!" ;;
esac

if [ "$deint" = "yes" ]; then
	deintstr=",deinterlace=enable"
else
	deintstr=
fi

# Let's do it
echo "Input file: $infile"
echo "Output file: $outfile"
echo "Encoding at $bitrate+$arate kb/s, input $src, $aspect, cropping $crop, de-interlace $deint"
echo
echo '>>>' $VLC -I dummy "$infile" --sout "#transcode{$sizestr$deintstr,vcodec=h264,vb=$bitrate, acodec=mpga,ab=$arate,channels=2,samplerate=44100}:standard{mux=mp4,dst=\"$outfile\",access=file}" vlc://quit
echo
$VLC -I dummy "$infile" --sout "#transcode{$sizestr$deintstr,vcodec=h264,vb=$bitrate, acodec=mpga,ab=$arate,channels=2,samplerate=44100}:standard{mux=mp4,dst=\"$outfile\",access=file}" vlc://quit