Difference between revisions of "Skins"
| Line 32: | Line 32: | ||
To change to a downloaded skin, '''right-click''' anywhere on the skin's background and choose ''Interface''. | To change to a downloaded skin, '''right-click''' anywhere on the skin's background and choose ''Interface''. | ||
| − | Then chose either '' | + | Then chose either ''Select skin'' to change to a skin that is located in the default skin folder of VLC or ''Open skin'' to open a skin file that is located elsewhere. |
http://images.videolan.org/images/wiki/change_skin.jpg | http://images.videolan.org/images/wiki/change_skin.jpg | ||
Revision as of 12:00, 2 July 2010
VLC media player supports skins (sometimes also called themes) through its skins2 interface module. To get new skins go to the Skins website.
The steps mentioned here apply to VLC 0.9 and upward.
Skins are not available on Mac OS X.
If you do have problems with VLC after applying a skin, a reinstall is NOT necessary. See How do I fix VLC when it does not anymore show up properly.
Contents
How to switch to the Skins interface
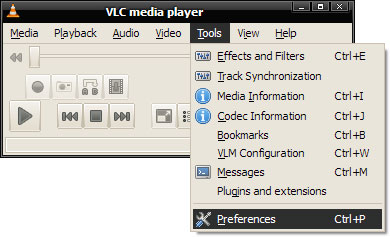
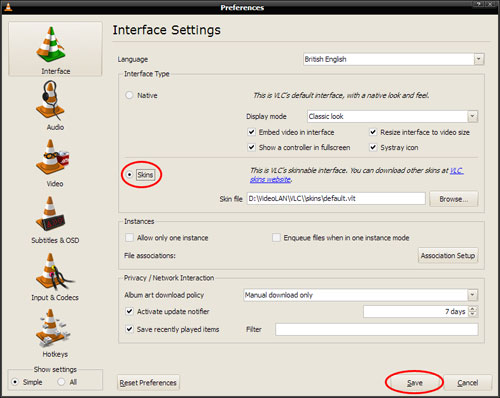
In order that you can use skins you have to change from VLC's native interface to the skinnable one. You can do that by opening the preferences and choosing Skins as the Interface type. Then click the Save button and restart VLC. It should then show up in the default skin.


or use command-line to start VLC with skins interface
vlc -I skins2
How to get new skins and where to save them
You can download a variety of skins from the Skins website. They usually should come as files with the extension "VLT". Although your browser or operating system might identify them as archive files, don't unpack them. Rather put them as they are into the skins folder of VLC.
On Windows this folder is located in the installation directory of VLC,
- e.g. C:\Program Files\VideoLAN\VLC\skins.
On Linux/Unix it is located in
- ~/.local/share/vlc/skins2.
If you downloaded the skin pack just unpack it to the folders mentioned above.
How to change to another skin
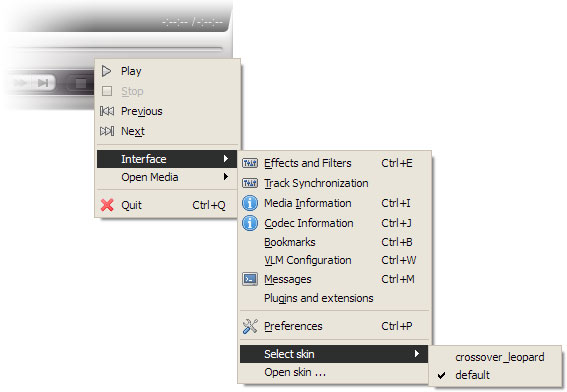
To change to a downloaded skin, right-click anywhere on the skin's background and choose Interface. Then chose either Select skin to change to a skin that is located in the default skin folder of VLC or Open skin to open a skin file that is located elsewhere.

How to switch back to VLC's default interface
When you open VLC and the skin you chose appears, right-click somewhere on the skins background and then choose Interface and Preferences (also accessible by pressing Ctrl+P). In the preferences dialog change the Interface type to Native. Then click save and restart VLC. It should show up in its default interface.
How do I fix VLC when it does not anymore show up properly
If you chose a broken skin it might happen that VLC does not anymore show up properly and that you cannot anymore access the settings as mentioned above.
Then you have to switch back to the default interface.
On Windows you can just open your Start menu and open
- All programs > VideoLAN > Quick Settings > Interface > Set Main Interface to Qt (default)
On any other system, or when the start menu entry is missing, run VLC with the following command line:
vlc -I qt
Now that VLC has been started with its native interface you can open the preferences (Ctrl+P) and change the active skin file. Chose the default skin or a skin you know that works. Then again set the skin interface to be the default one and restart VLC.
How to create your own skin
There exists a program that enables you to create skins without any deep knowledge how skins are made up exactly. It is the VLC Skin Editor
If you'd rather want to explore all the possibilities of the skin system and get to know how skins are made up and how to create them in detail, check out the Skins2 documentation.
If you have any problems while creating your skin, please turn to the skins forum.